How to Use Autosend.id
A complete guide in plain English. Follow along step by step — from creating your account to running automated message schedules.
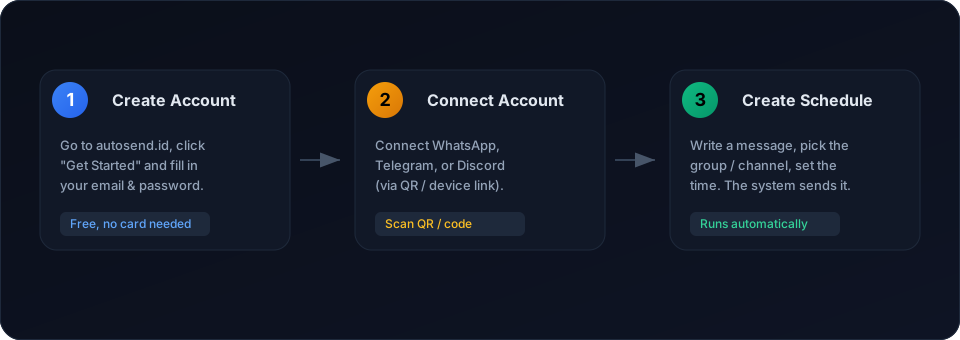
1. Getting Started
Autosend sends messages automatically to WhatsApp, Telegram, and Discord groups or channels — without you needing to stay online. Just connect your account, write a message, and set the schedule. The system handles the rest.
Create an account
Try the Trial plan
2. Connect Your Accounts
To send messages, Autosend needs access to your account. This is done from the Accounts menu (left sidebar) — click Connect Account.
Pick a platform
Scan the QR code on your phone
- WhatsApp → open WhatsApp > Linked Devices > scan the QR code (just like WhatsApp Web).
- Telegram → enter your number, receive an OTP code, then enter it.
- Discord → scan the QR code in the Discord app, or use the bookmarklet button.
Done — account connected
3. Create Schedules
A schedule is an automated sending task. Open the Schedules menu → click New Schedule.
Pick an account & destination
Write your message
{Hello|Hi|Good morning} everyone! The system picks a word at random.Set the frequency
Save & it runs
4. Subscription & Payment
Your plan determines how long it stays active and how many accounts you can use. Everything is managed from the Billing menu.
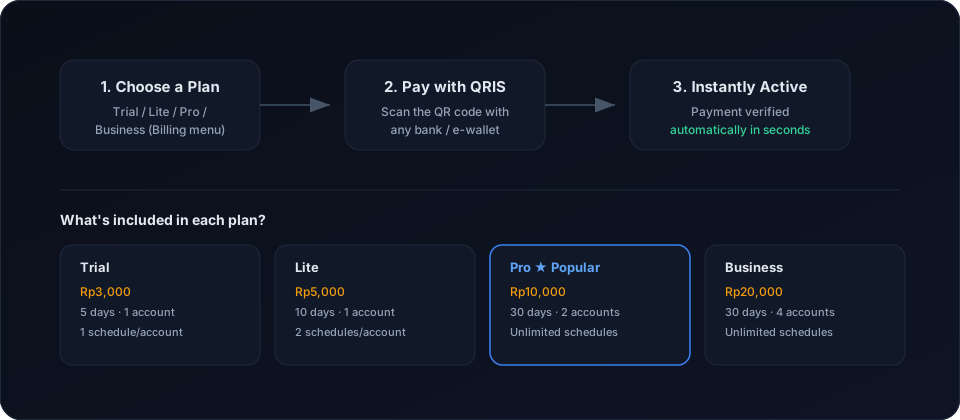
Browse the plans
Click Purchase
Pay with QRIS
Instantly active
5. Monitor & Settings
Logs — review your sending history
Every message sent (success or failed) is recorded in the Logsmenu. If something fails, you'll see it here along with the reason.
Settings — change password & Discord
In the Settings menu you can change your password and link your Discord account (to monitor logs from a Discord server).
Earn — get paid from your accounts (coming soon)
A feature to rent out your accounts to other users and get paid per message. Still in development.
6. Troubleshooting
Running into trouble? Open the Support menu → click Create Ticket. Write a short subject, describe the issue, and tell us how to reach you (WhatsApp/Telegram). Our team will reply through that contact.
Frequently asked questions
- Account logged out (checkpoint)? Go to Accounts → click Sync to reconnect.
- Schedule not sending? Check the account status (must be Active) and plan status (must be Active / not expired).
- QR code not showing? Refresh the page, make sure your connection is stable, then try again.
Ready to start?